Defold is great, but when it comes to designing levels, integrating an external tool like Tiled can significantly enhance your workflow. Tiled is a free, open-source map editor that supports a wide range of formats and allows you to create tile-based game worlds with ease. It's snappy, fast, highly extendable, and its been around for as long as I can remember.
What's even better is that out of the box, it supports exporting Defold tilemaps and collections. What's slightly disappointing is that after getting Tiled-pilled, you realize there's a lot of things it would be nice to specify in the level editor that you can't because Defold tilemaps do not support those features.
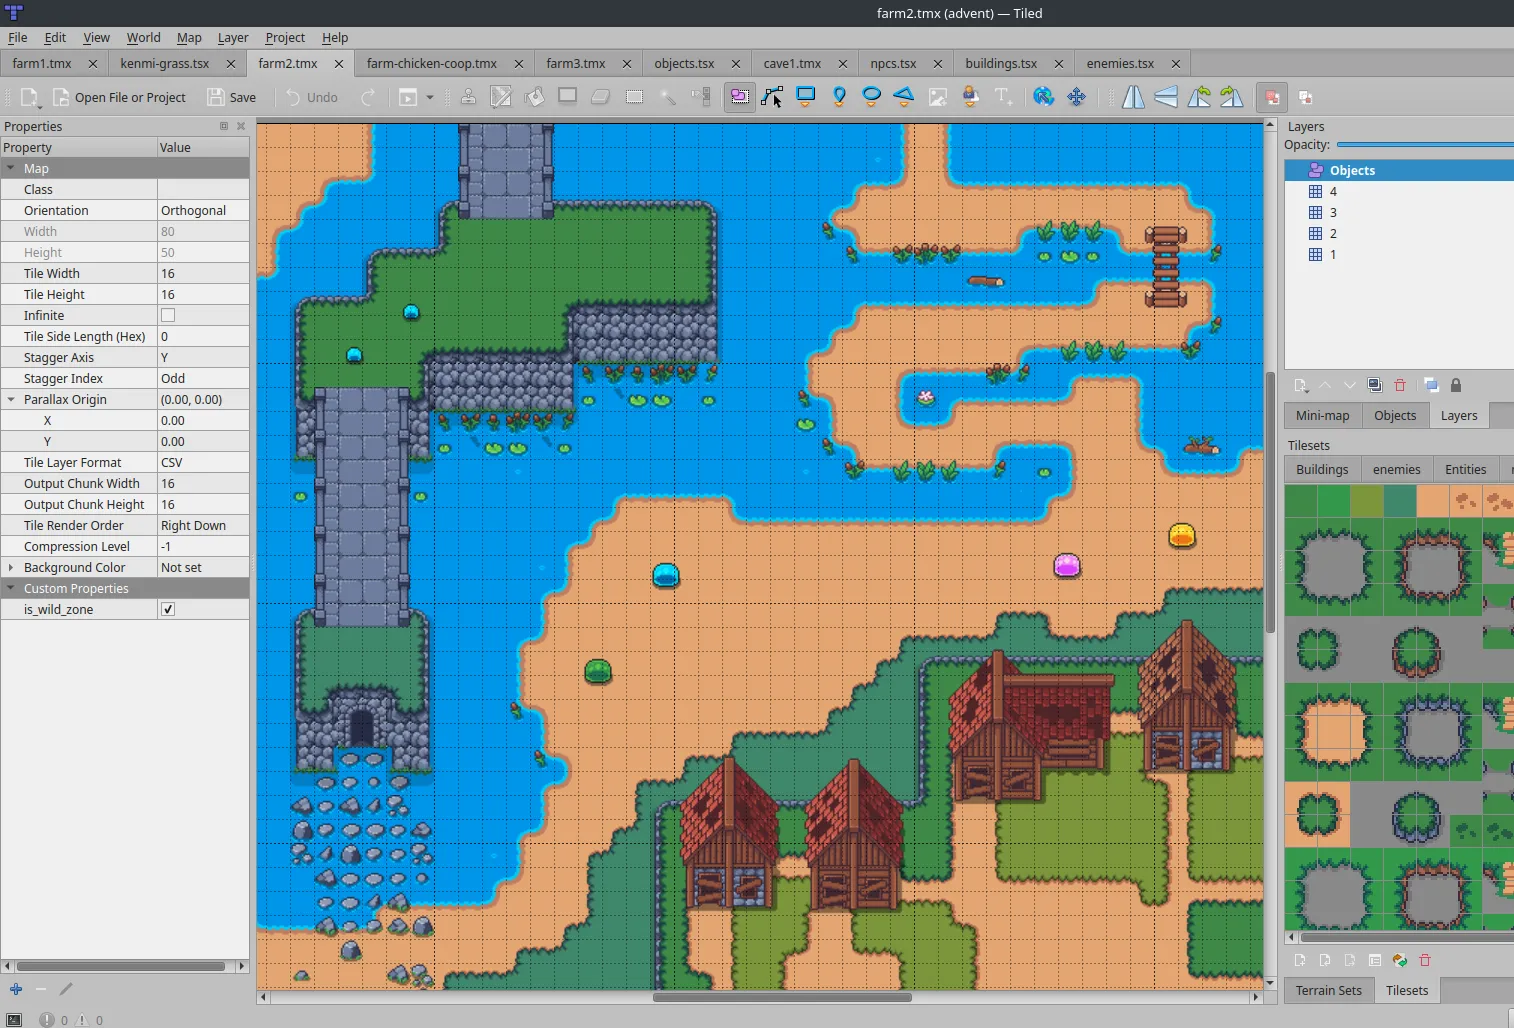
I'm going to show you how I set object spawn positions in Tiled, export them as JSON, and load them with Defold.
The Two Export System
The short of it is that we are exporting one file for the tiles and another file for the objects. First I'll show you the basics of exporting and using each file and then we'll look at writing a custom Tiled extension that handles exporting both files in one action so that it's not such a pain in the ass to iterate on levels.
Defold Tilemap
Enable the Defold Plugin
Go to Edit > Preferences > Plugins and click checkbox for
libdefold.solibdefoldcollection.so.
We're not going to be touching the latter but you might want to try it out.
Add the Tilesource Path
Tiled has no way to know what tilesource file your exported tilemap should use unless you specify it as a map custom property. Don't make the mistake I did and fail to configure this, because otherwise you will be manually resetting the tilesource on the tilemap every time you export. This really slows down iterations a lot and I wish I had figured it out sooner than I did.
You can read about it in the documentation.

But basically what you're doing is, for each map, do Map > Map Propereties. At the bottom, right click on Custom Properties and select Add Property.
Add a string with the property name tile_set and use the path from Defold to your tilesource.
Now when you File > Export As, you can select Defold tilemap and you'll have all your tile layers from Tiled in Defold.
Tiled JSON
Tiled has an export option for JSON that will produce .tmj or .json files. Go ahead and just try it. Open that file up in a text editor and have a look. It contains a great deal of metadata that might be useful if you were loading this level into another level editor. For us, not only does it have tons of useless information, but it duplicates info that we already have in our exported tilemap file. The one thing it has that we need is its object layers.
We're going to clean this up later but for now don't worry about it.
Configure Defold Custom Resources directory.
In order to have this json available to us at runtime, we have to specify a place to put it where Defold knows not to mess with those files at build time. In your game.project there is a Custom Resource property where you can specify a directory relative to your project root. I use /resource.
You can read about this in the documentation.
Parsing JSON for Object Positions
I have all this code in level.script.
local tile_size = 16

local function get_spawn_positions(self, layer_name, snap_to_tile)
    local positions = {}

    local snap_to_tile = snap_to_tile or false

    for _, layer in ipairs(self.data.layers) do
        if layer.name == layer_name then
            for _, object in ipairs(layer.objects) do
                local x = object.x
                local y = (self.map.h * tile_size) - object.y

                if snap_to_tile then
                    x = math.floor(x / tile_size) * tile_size + tile_size / 2
                    y = math.floor(y / tile_size) * tile_size + tile_size / 2
                end

                table.insert(positions, {
                    id = object.id,
                    x = x,
                    y = y
                })
            end
            break
        end
    end

    return positions
end
Pay Attention to the Y Axis
Tiled and Defold use opposite Y-axis. In Tiled, 0,0 is at the top left and counts up going down on Y. In Defold, it's the opposite. This is why we have to transform the Y coordinate of the object like so: local y = (self.map.h * tile_size) - object.y.
Optional Snap to Tile
You can optionally force an object to snap its position to the center of the tile. This makes it easier to place objects that should have the semblance of being tiles to the player.
Creating Objects with Factory
In the init function, you can do something like this.
function init(self)
local x, y, w, h = tilemap.get_bounds("#tilemap")
self.map = {x=x, y=y, w=w, h=h}
local resource = sys.load_resource("/resource/tilemaps/one.tmj")
if resource then
self.data = json.decode(resource)
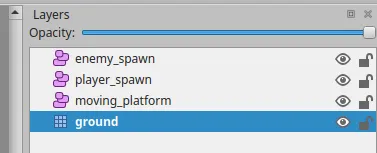
self.player_spawn_positions = get_spawn_positions(self, "player_spawn")
set_player_spawn_position(self)
self.enemy_spawn_positions = get_spawn_positions(self, "enemy_spawn")
self.enemies = {}
spawn_enemies(self)
self.platform_spawn_positions = get_spawn_positions(self, "moving_platform", true)
self.platforms = {}
spawn_platforms(self)
end
end
Notice that we're using the names from the object layers in the image at the top of this post. There isn't error handling here so you might want to deal with that or just get your names right.
I'm not going to post every one of these functions since yours will be different, but each one is basically just a wrapper for a factory.create call.
local function spawn_enemies(self)
    for _, spawn_position in ipairs(self.enemy_spawn_positions) do
        local enemy = factory.create("#enemy_factory", vmath.vector3(spawn_position.x, spawn_position.y, 0))
        table.insert(self.enemies, enemy)
    end
end
This is the simplest one I have and should be the foundation of any other.
Cleaning Up the JSON File
Now that it works, we should think about all the unnecessary data in the .tmj that is adding to our game's page weight. You might decide this isn't important if you're not deploying to web but here is my shitty afterthought solution to this problem nevertheless.
Navigate back to Edit > Preferences > Plugins and at the bottom you'll se a directory where extensions are located.
Create a file in that directory, filter_objectgroup_layers.py or whatever better named file you can come up with.
import json
import sys
import os

def filter_objectgroup_layers(input_file, output_file):
    try:
        with open(input_file, "r") as f:
            input_json = json.load(f)

        filtered_json = {
            "layers": [
                layer for layer in input_json.get("layers", []) if layer.get("type") == "objectgroup"
            ]
        }

        with open(output_file, "w") as f:
            json.dump(filtered_json, f, indent=4)

        print(f"Filtered JSON saved to {output_file}")

    except FileNotFoundError:
        print(f"Error: File {input_file} not found.")
    except json.JSONDecodeError:
        print(f"Error: File {input_file} is not a valid JSON file.")
    except Exception as e:
        print(f"An unexpected error occurred: {e}")

if __name__ == "__main__":
    if len(sys.argv) != 3:
        print("Usage: python script.py <input_json_file> <output_json_file>")
    else:
        input_file = sys.argv[1]
        output_file = sys.argv[2]

        if not os.path.exists(input_file):
            print(f"Error: The file '{input_file}' does not exist.")
        else:
            filter_objectgroup_layers(input_file, output_file)
You can test that it works:
python3 filter_objectgroup_layers.py /my/resource/file.tmj test.tmj.
If you look at both the input and output files after in a text editor, you'll notice there is a lot less stuff. In truth, we may not need everything still in there, but it's small enough that I don't want to preemptively start removing things that I might want to be available in the future.
One last thing...
Export Both Files in One Action

To accomplish this we have to write a Tiled extension.
Create defold-tilemap-object-export.js or whatever better named file you can come up with and put it with the python file we made before in the extensions directory.
const action = tiled.registerAction("ExportDefoldAndJson", function(action) {
    let map = tiled.activeAsset;

    if (!map || !map.isTileMap) {
        tiled.alert("No active tile map to export.");
        return;
    }

    const basePath = tiled.project.property("export_dir")
    if (!basePath) {
        tiled.alert("The export_dir custom property on project not set so not sure where to save.");
        return;
    }

    if (!File.exists(basePath)) {
        tiled.alert("The export_dir custom property does not appear to exist on filesystem.");
        return;
    }

    const defoldFormat = tiled.mapFormat("defold");
    if (!defoldFormat) {
        tiled.alert("The Defold plugin is not enabled under Edit > Preferences > Plugins");
        return;
    }

    const baseName = FileInfo.baseName(map.fileName);

    let tilemapPath = `${basePath}${baseName}.tilemap`;
    let tmjPath = `${basePath}${baseName}.tmj`;

    defoldFormat.write(map, tilemapPath);
    tiled.mapFormat("json").write(map, tmjPath);

    const process = new Process();
    const scriptPath = tiled.extensionsPath + "/filter_objectgroup_layers.py"
    process.exec("python3", [
        scriptPath,
        tmjPath,
        tmjPath
    ]);
});

action.text = "Export Defold Tilemap And JSON"
action.shortcut = "Ctrl+Alt+E"

tiled.extendMenu("File", [
    { action: "ExportDefoldAndJson", before: "ExportAs" }
]);
There is nothing stopping you from just hard coding the export directory, however I wanted to make this modular for different projects. To configure it you need to create a new project, load all your maps into it, and then click Project > Project Properties. Create a custom property for a string, export_dir and set it to your Defold resource directory where your tilemaps and object JSONs should be located.
Now you don't even have to select a save location when you export. Just Ctrl+S to save the .tmx and Ctrl+Alt+E to move everything over to Defold where you're immediately ready to play with it.
Happy New Year